Installation#
Installing and running kubernetes in our local environment can be a challenge. However, there are some alternatives to simplify this task:
Docker desktop#
Docker Desktop is an out-of-the-box, all-in-one container management application that provides developers and development teams with a set of tools to create, share and run containers in any environment.
To install kubernetes using Docker Desktop you must follow the steps below:
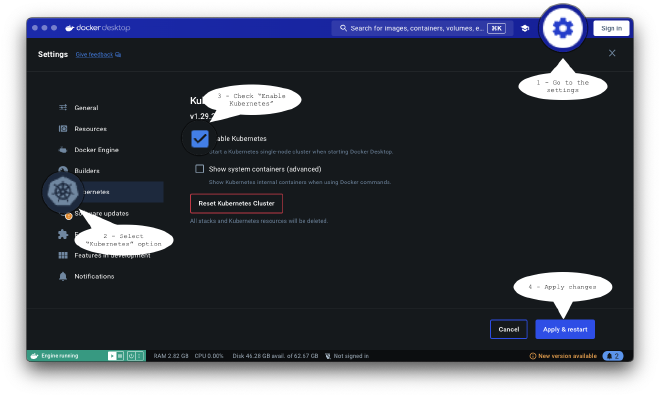
- In the Docker control panel, select Configuration.
- Select Kubernetes in the left sidebar.
- Select the Enable Kubernetes check box.
- Select Apply and Restart to save the settings, and then select Install to confirm.
This will instantiate the images required to run the Kubernetes server as containers and install the /usr/local/bin/kubectl command on your machine.
Minikube#
Minikube is an open source tool that, through the use of virtualization, provides a local Kubernetes environment.
Install Minikube on macOS#
You can install Minikube on macOS using Homebrew
Run the installation command
brew install minikubeStart the cluster with the command
minikube start
Install Minikube on Linux#
Run the installation instructions
curl -LO https://storage.googleapis.com/minikube/releases/latest/minikube-linux-amd64
sudo install minikube-linux-amd64 /usr/local/bin/minikube && rm minikube-linux-amd64
Start the cluster with the command
minikube start
First steps with kubernetes#
Now that we have installed a local instance of kubernetes. It’s time to create and run our first POD.
Kubectl#
Kubectl is a command line tool that allows you to run operations against a Kubernetes cluster. With Kubectl we can deploy applications, list, manage, scale resources, view logs and more.
Installation#
Install Kubectl on macOS#
Can install kubectl using Homebrew
Run the installation command
orbrew install kubectlbrew install kubernetes-cliVerify the kubectl installed version
kubectl version --client
Install Kubectl on Linux#
Download the latest stable version of kubectl
curl -LO "https://dl.k8s.io/release/$(curl -L -s https://dl.k8s.io/release/stable.txt)/bin/linux/amd64/kubectl"Verify the downloaded binary file
Download the checksum file
curl -LO "https://dl.k8s.io/release/$(curl -L -s https://dl.k8s.io/release/stable.txt)/bin/linux/amd64/kubectl.sha256"Validate the downloaded binary file against the checksum file
echo "$(cat kubectl.sha256) kubectl" | sha256sum --check
--
kubectl: OK
Install kubectl
sudo install -o root -g root -m 0755 kubectl /usr/local/bin/kubectlVerify the kubectl installed version
kubectl version --client
Configuration#
All configuration related to Kubernetes and kubectl is stored in the configuration file .kube/config. However, kubectl allows you to manage some configuration parameters through the config command.
kubectl config --help

Available Commands:
  current-context   Display the current-context
  delete-cluster    Delete the specified cluster from the kubeconfig
  delete-context    Delete the specified context from the kubeconfig
  delete-user       Delete the specified user from the kubeconfig
  get-clusters      Display clusters defined in the kubeconfig
  get-contexts      Describe one or many contexts
  get-users         Display users defined in the kubeconfig
  rename-context    Rename a context from the kubeconfig file
  set               Set an individual value in a kubeconfig file
  set-cluster       Set a cluster entry in kubeconfig
  set-context       Set a context entry in kubeconfig
  set-credentials   Set a user entry in kubeconfig
  unset             Unset an individual value in a kubeconfig file
  use-context       Set the current-context in a kubeconfig file
  view              Display merged kubeconfig settings or a specified kubeconfig file
For the purposes of this first approach, we will configure the context1 on which we are going to work:
Get the available contexts
kubectl config get-contexts
CURRENT   NAME             CLUSTER          AUTHINFO         NAMESPACE
*         docker-desktop   docker-desktop   docker-desktop
          minikube         minikube         minikube         default
Use the desired context (for the purposes of this series, minikube will be used).
kubectl config use-context minikube
Switched to context "minikube".
Verify that the desired context is now being used
kubectl config current-context
minikube
As we progress in this series, we will delve into other configuration options such as: Creating clusters, contexts and users.
Usage#
Once we have successfully selected the context we are going to work on it is time to run a first pod.
Get objects#
To list objects in Kubernetes we have the get command available.
pods
kubectl get pods
No resources found in default namespace.
services
kubectl get services
NAME         TYPE        CLUSTER-IP   EXTERNAL-IP   PORT(S)   AGE
kubernetes   ClusterIP   10.96.0.1    <none>        443/TCP   10d
deployments
kubectl get deployments
No resources found in default namespace.
There are other types of resources in Kubernetes (ConfigMap, CronJob, Job, Secret, etc) which we will delve into in future articles of this series.
Create objetos#
There are two ways to create 2 objects in a Kubernetes cluster:
Using the avaiable kubectl commands
Create the pod with the command run
kubectl run nginx-k8s --image=nginx
pod/nginx-k8s created
Verify the pod status
kubectl get pod nginx-k8s
NAME        READY   STATUS    RESTARTS   AGE
nginx-k8s   1/1     Running   0          4s
Using a manifest file
Managing resources in a kubernetes cluster using kubectl commands can be quite complex. For this there is the possibility to define the different types of resources using a manifest file written in YAML3, such changes can be applied using kubectl’s apply command.
Create a nginx-pod.yaml file with the following content
apiVersion: v1
kind: Pod
metadata:
  name: nginx-k8s
  labels:
    name: nginx-k8s
spec:
  containers:
  - name: nginx-k8s
    image: nginx:stable
    resources:
      limits:
        memory: "128Mi"
        cpu: "500m"
Apply the changes
kubectl apply -f nginx-pod.yaml
pod/nginx-k8s created
Verify the pod status
kubectl get pods
NAME             READY   STATUS    RESTARTS   AGE
nginx-k8s        1/1     Running   0          16m
We can see how a new pod has been created with the name nginx-k8s.
Describe objects#
To view the details of any kubernetes resource, use the kubectl describe command.
The describe command allows you to display the details of a specific resource or a group of resources. It prints a detailed description of the selected resources, including related resources such as events or controllers.
kubectl describe pod nginx-k8s
Name:             nginx-k8s
Namespace:        default
Priority:         0
Service Account:  default
Node:             minikube/192.168.49.2
Start Time:       Mon, 03 Jun 2024 12:39:49 -0500
Labels:           name=nginx-k8s
Annotations:      <none>
Status:           Running
IP:               10.244.0.5
IPs:
  IP:  10.244.0.5
Containers:
  nginx-k8s:
    Container ID:   docker://7582c54b05625add5401fe0178526a628d2eacad843a6be3fe8816b1c435d499
    Image:          nginx
    Image ID:       docker-pullable://nginx@sha256:0f04e4f646a3f14bf31d8bc8d885b6c951fdcf42589d06845f64d18aec6a3c4d
    Port:           <none>
    Host Port:      <none>
    State:          Running
      Started:      Mon, 03 Jun 2024 12:39:51 -0500
    Ready:          True
    Restart Count:  0
    Environment:    <none>
    Mounts:
      /var/run/secrets/kubernetes.io/serviceaccount from kube-api-access-mvjl2 (ro)
Conditions:
  Type                        Status
  PodReadyToStartContainers   True
  Initialized                 True
  Ready                       True
  ContainersReady             True
  PodScheduled                True
Volumes:
  kube-api-access-mvjl2:
    Type:                    Projected (a volume that contains injected data from multiple sources)
    TokenExpirationSeconds:  3607
    ConfigMapName:           kube-root-ca.crt
    ConfigMapOptional:       <nil>
    DownwardAPI:             true
QoS Class:                   BestEffort
Node-Selectors:              <none>
Tolerations:                 node.kubernetes.io/not-ready:NoExecute op=Exists for 300s
                             node.kubernetes.io/unreachable:NoExecute op=Exists for 300s
Events:
  Type    Reason     Age   From               Message
  ----    ------     ----  ----               -------
  Normal  Scheduled  49m   default-scheduler  Successfully assigned default/nginx-k8s to minikube
  Normal  Pulling    49m   kubelet            Pulling image "nginx"
  Normal  Pulled     49m   kubelet            Successfully pulled image "nginx" in 1.168s (1.168s including waiting). Image size: 192993703 bytes.
  Normal  Created    49m   kubelet            Created container nginx-k8s
  Normal  Started    49m   kubelet            Started container nginx-k8s
There are other types of resources in Kubernetes (Service, Deployment, ConfigMap, CronJob, Job, Secret, etc) which we will delve into in future installments of this series.
Edit objects#
Kubectl allows us to make some modifications to kubernetes resources through a manifest file.
Create a nginx-pod-edit.yaml file with the following content
apiVersion: v1
kind: Pod
metadata:
  name: nginx-k8s
  labels:
    name: nginx-k8s
  annotations:
    desc: "This is a nginx pod created as example"
spec:
  containers:
  - name: nginx-k8s
    image: nginx:stable
    resources:
      limits:
        memory: "254Mi"
        cpu: "1000m"
Apply the changes
kubectl apply -f nginx-pod-edit.yaml
pod/nginx-k8s configured
Verify the pod changes
kubectl describe pod nginx-k8s
Name:             nginx-k8s
Namespace:        default
Priority:         0
Service Account:  default
Node:             minikube/192.168.49.2
Start Time:       Mon, 03 Jun 2024 14:17:04 -0500
Labels:           name=nginx-k8s
Annotations:      desc: This is a nginx pod created as example
Status:           Running
IP:               10.244.0.9
IPs:
  IP:  10.244.0.9
Containers:
  nginx-k8s:
    Container ID:   docker://bafb513c9231b50570d4f601799661f48da8d214167ade9f92fc70d44bd693a8
    Image:          nginx:stable
    Image ID:       docker-pullable://nginx@sha256:ec881e8e2b068e388e992e0e12360ff9f93737f90eb3e346d0ceac83710383d8
    Port:           <none>
    Host Port:      <none>
    State:          Running
      Started:      Mon, 03 Jun 2024 14:17:04 -0500
    Ready:          True
    Restart Count:  0
    Limits:
      cpu:     1
      memory:  254Mi
    Requests:
      cpu:        1
      memory:     254Mi
    Environment:  <none>
    Mounts:
      /var/run/secrets/kubernetes.io/serviceaccount from kube-api-access-tfk4m (ro)
Conditions:
  Type                        Status
  PodReadyToStartContainers   True
  Initialized                 True
  Ready                       True
  ContainersReady             True
  PodScheduled                True
Volumes:
  kube-api-access-tfk4m:
    Type:                    Projected (a volume that contains injected data from multiple sources)
    TokenExpirationSeconds:  3607
    ConfigMapName:           kube-root-ca.crt
    ConfigMapOptional:       <nil>
    DownwardAPI:             true
QoS Class:                   Guaranteed
Node-Selectors:              <none>
Tolerations:                 node.kubernetes.io/not-ready:NoExecute op=Exists for 300s
                             node.kubernetes.io/unreachable:NoExecute op=Exists for 300s
Events:
  Type    Reason     Age   From               Message
  ----    ------     ----  ----               -------
  Normal  Scheduled  12m   default-scheduler  Successfully assigned default/nginx-k8s to minikube
  Normal  Pulled     12m   kubelet            Container image "nginx:stable" already present on machine
  Normal  Created    12m   kubelet            Created container nginx-k8s
  Normal  Started    12m   kubelet            Started container nginx-k8s
Delete objects#
To delete a resource from a kubernetes cluster, use the delete kubectl command.
Delete a pod by name
kubectl delete pod nginx-k8s
pod "nginx-k8s" deleted
Delete a pod by label
kubectl delete pod -l name=nginx-k8s
pod "nginx-k8s" deleted
There are other types of resources in Kubernetes (Service, Deployment, ConfigMap, CronJob, Job, Secret, etc) which we will delve into in future installments of this series.
Get logs from a pod (container)#
In certain occasions we will need to access the log records. For this there is the log command of kubectl.
kubectl logs nginx-k8s
/docker-entrypoint.sh: /docker-entrypoint.d/ is not empty, will attempt to perform configuration
/docker-entrypoint.sh: Looking for shell scripts in /docker-entrypoint.d/
/docker-entrypoint.sh: Launching /docker-entrypoint.d/10-listen-on-ipv6-by-default.sh
10-listen-on-ipv6-by-default.sh: info: Getting the checksum of /etc/nginx/conf.d/default.conf
10-listen-on-ipv6-by-default.sh: info: Enabled listen on IPv6 in /etc/nginx/conf.d/default.conf
/docker-entrypoint.sh: Sourcing /docker-entrypoint.d/15-local-resolvers.envsh
/docker-entrypoint.sh: Launching /docker-entrypoint.d/20-envsubst-on-templates.sh
/docker-entrypoint.sh: Launching /docker-entrypoint.d/30-tune-worker-processes.sh
/docker-entrypoint.sh: Configuration complete; ready for start up
2024/06/03 19:17:04 [notice] 1#1: using the "epoll" event method
2024/06/03 19:17:04 [notice] 1#1: nginx/1.26.1
2024/06/03 19:17:04 [notice] 1#1: built by gcc 12.2.0 (Debian 12.2.0-14)
2024/06/03 19:17:04 [notice] 1#1: OS: Linux 6.6.26-linuxkit
2024/06/03 19:17:04 [notice] 1#1: getrlimit(RLIMIT_NOFILE): 1048576:1048576
2024/06/03 19:17:04 [notice] 1#1: start worker processes
2024/06/03 19:17:04 [notice] 1#1: start worker process 29
2024/06/03 19:17:04 [notice] 1#1: start worker process 30
2024/06/03 19:17:04 [notice] 1#1: start worker process 31
2024/06/03 19:17:04 [notice] 1#1: start worker process 32
Execute commands inside a pod#
To execute commands in the containers of a pod we use the kubernetes exec command.
kubectl exec nginx-k8s -- date
Mon Jun  3 20:57:23 UTC 2024
Execute a command interactively The exec command of kubernetes by default will execute the operation, return the response and close the execution. However, sometimes we may require the execution to be performed interactively (as in the case of require to access the container shell) for those cases we will use the it option.
kubectl exec nginx-k8s -it -- /bin/sh
# whoami
root
# exit