Kubernetes was developed by Google engineers before going open source in 2014. Kubernetes means helmsman or pilot in Greek, hence the rudder in the Kubernetes logo.
Basic concepts#
Container#
A container could be defined as a computing unit that packages the source code and software requirements necessary to distribute and run applications or services. Containers take advantage of a form of virtualization of the host operating system that allows resource sharing, isolates processes and controls the amount of cpu, memory and disk that can be accessed by them. The main advantage of containers is that they do not need to include an operating system on each instance; instead they leverage a form of host OS virtualization to access resources such as CPU, memory, disk and network to run applications or services. This makes them extremely small, fast and portable.
Beneffits#
Efficiency#
Containers require fewer host system resources, so they are often more efficient than other types of virtualization because they do not require the installation of a new operating system to operate.
Portability#
Because they package both: source code and software requirements (programming languages, libraries, etc.), containers can be easily implemented. Both in teams of developers, in data centers and in multiple operating systems.
Interoperability#
Containers are especially useful for development teams, as they free the developer from installing dependencies and development environments, as they package everything needed to install their local environment.
POD#
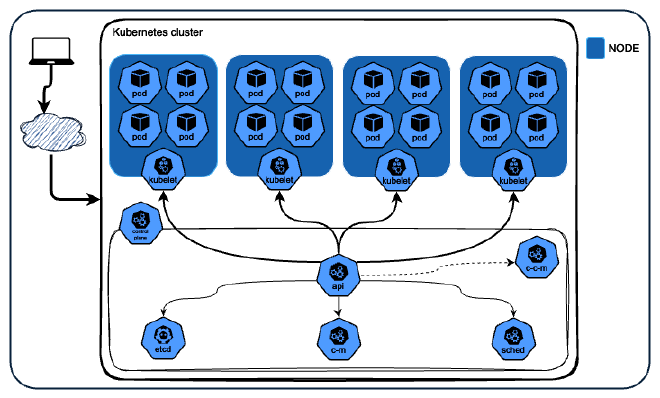
A POD is a set of one or more containers that share the same computing resources. It is considered the smallest component of a Kubernetes cluster. Generally a POD consists of a single container, but in some advanced cases it can host more than one container.
Main components of a Kubernetes cluster#
Control plane#

Its components are responsible for ensuring the good work of the cluster by responding to cluster events (e.g., starting a new pod when the number of replicas is not the desired).
kube-api-server#
It provides an API that allows you to control the Kubernetes cluster. It is responsible for handling external and internal requests, as well as determining whether a request is valid and then processing it. The API can be accessed using the kubectl cli command and through REST requests.
etcd#
A key => value database that contains information about the status and configuration of the cluster.
scheduler#
Responsible for monitoring newly created or unassigned pods and assigning them to the nodes that best fit its requirements.
Some factors considered when selecting the best node includes:
- Resource policy.
- Hardware and software restrictions.
- Data location.
kube-controller-manager#
It executes the controller processes.
Each controller is a compiled binary that is responsible for executing a specific process. There are many different types of drivers, some examples of which are:
Node Controller: Responsible for monitoring the status of the nodes and responding when they go down.
Job Controller: It looks for work objects that represent single tasks and then creates pods to execute those tasks.
EndpointSlice Controller: It is responsible for providing a link between the services and the pods.
cloud-controller-manager#
A control-plane component that incorporates cloud-specific control logic. For example: cloud-controller-manager allows cloud service providers to integrate their platforms into our kubernetes cluster.
Kubelet#
Kubelet is the agent in charge of managing each node according to a set of specifications called PodSpecs, ensuring that the containers described therein are working and in good condition. His responsibilities include:
- Ensure that the containers are running in the correct pod.
- Monitor that the containers are running correctly.
- Stopping the containers when required.
So far we have seen an introduction to Kubernetes, some basic concepts and its main components; in later installments of this series we will talk about how to install Kubernetes in our local environment, create our first pod and verify its correct operation.

